Started my WWPD exposure at 8am: the bathroomcam has a 16 hour exposure! (2 days) #pinhole#day @pinholeday
— crunchy footsteps (@crunchyfeet) April 27, 2013
After my morning coffee, it's time to transform the bathroom into a giant pinhole camera for Worldwide Pinhole Day! @pinholeday
— crunchy footsteps (@crunchyfeet) April 27, 2013
We made a really fun journey to San Diego last month for one of Daughter's gymnastics meets. Along the way, we stopped at the Imperial Sand Dunes, between Yuma and EL Centro, along Interstate 8. It was just a little one-hour rest break, but I think it was one of the highlights of our weekend!
The Tatoonie scenes of the Star Wars movies were shot in the Imperial Dunes, which upped the coolness factor for the kids. This place is so cool, anyway!
Here's some footage I put together, using our point-and-shoot images and video, and also the pinhole images I made there.
If you get the opportunity to stop there sometime, I heartily recommend it!
This is largely an ATV recreational area, and a week-long permit is
required for camping and driving on the dunes. You can't buy the permit
on site- but it must be purchased either in Yuma or El Centro. We
talked to the very nice campground host, who told us that we could
briefly visit without the pass, meaning we could walk on to the dunes
from the parking area, so long as we did not drive on the sand. We did
this, and had a great awe-inspiring time.
You can also drive down Grays Wells Road to an exhibit of an authentic portion of a wood plank road, which was used from 1914-1927, for the old Model Ts to cross.
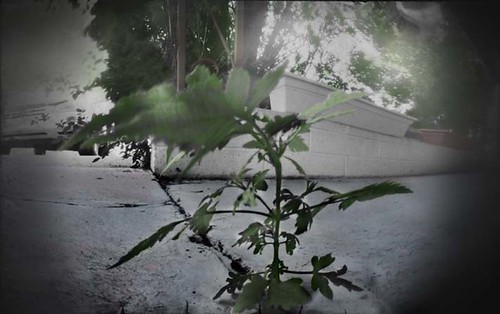
paintcan pinhole camera, paper negative, 15-minute exposure, developed in caffenol C, colorized in Photoshop
Ok..so it is really just a weed growing out of the cement, not a tree. I pass it every time I walk in or out the door. I cheer it on as it struggles to grow out of the cement, knowing that I can live with my own struggles, as it does.
paintcan pinhole camera, paper negative, 66 second exposure, developed in homemade "Caffenol C", colorized in Photoshop
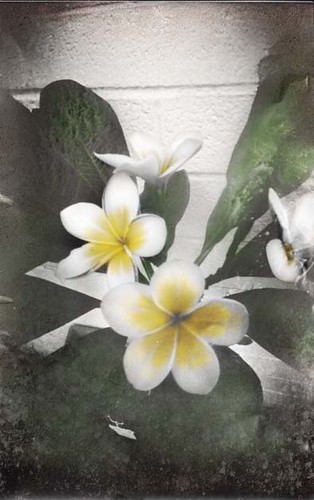
While in Hawaii some 25-ish years ago, I fell in love with the plumerias there. Their simple elegance and lovely tropical scent has haunted me ever since, especially because I hadn't seen a plumeria blossom in-the-flesh since the '80s....
But all that changed about a month ago, when the kids and I, ducking out of the rain in the Lowe's garden center, landed ourselves right in front of a display of little plumeria trees! They were all blooming! Be still my beating heart! Naturally, this tree came home with us. It turns out that one *can* grow tropical plumerias in the desert, given some special modifications!
I made this image the other day with the homemade paint can pinhole camera, and colorized it in Photoshop.
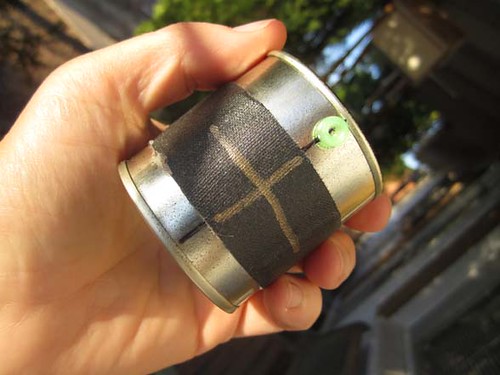
Via Flickr: I made a camera today in honor of Worldwide Pinhole Day, 2012, which is tomorrow!
Meet "wasabicam"! It is made from a little wasabi powder container. It has a great light-tight lid, and a nice focal length for it's relative size. It takes a little paper negative that is 3 inches x 1.625 inches. The pinhole is .012 inches- the smallest size drill bit that I have! Phew!
I am looking forward to putting it through it's paces tomorrow for WWPD 2012!
pinhole photo of the CaveKids in 2009, with the cookie tin pinhole camera.
I'm getting all geared up for Pinhole Day tomorrow! WWPD ("Worldwide Pinhole Photography Day" is a worldwide effort, where anyone can take a picture with a pinhole camera, and upload it to an international gallery. Just think...the whole world, photographed in pinhole, from one day in history, viewed in one gallery!
In honor of the day, I am making a new pinhole camera, from a little wasabi container. It's a perfect camera container- light-tight, (great lid!) round (for great distortion!) with a large-enough focal length for it's dimensions. I just hope I have a hobby drill bit small enough to make the aperture. (pinhole)- the focal length being only about 5 cm (2 inches). It will use photographic paper as the recording medium. ("film")
Wasabicam is still full 1/2 way with wasabi powder, so I guess the CaveFamily better make some sushi today to use it up!
Here is a video, showing some Italian news footage of a pinhole gallery exhibit, as well as some very cool pinhole cameras..check it out!!
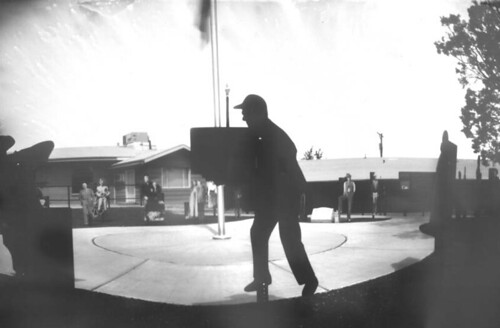
paint can pinhole camera, paper negative, 9 sec exp, developed in Caffenol C.
In our April following of the Cochise County History On The Move project, we found ourselves in Benson, Az, at City Hall, where the display has been set up in their courtyard.
However, our visit was on this past Saturday, and the courtyard was locked up behind the iron gate! The display is available for browsing Monday-Friday, during regular business hours only.
Oh well! Paint can cam (and the tripod) trespassed through the gate a few inches, and captured this panoramic of the display- an interesting view I have not captured yet.
When clicking on the photo for a larger view, you can recognize some of the life-sized photos of historic players in Arizona's young days:
Right in front is the back side (silhouette) of Sierra Vista police chief, C. Reed Vance, and then in the background from left to right:
A.R. Spikes, Rex Allen (Sr), Edward Roseberry Monk, Dr. James S Douglas, Naiche, Harrison M. Lavender *or* Raul Hector Castro, Else Tolles, Unidentified Man, and Jimmie Judd.
The state of Arizona turns 100 years old in 2012, and the centennial projects and celebrations abound around here! The Cochise County History On The Move Display is one such centennial project.
This project features life-sized (or nearly so) rigid historic photographs of folks who paved the way in Cochise County, Arizona's early years. The display will travel around to different locations throughout the year.
I found a spare 5 minutes today to spend with some tiny "weed"-daisies in my backyard. Some part of me just loves shallow depth of field, and flowers make such a beautiful and interesting study, with their multiple layers of pedally goodness.
I took my 50mm portrait lens off my camera, and turned it around backwards to get this ultra-macro, ultra f.0 shallow blurry look.
These past few months have been very busy with the kids' activities, and I have had next to no time for photographing. However, the schedule is changing for the warmer months, and I feel a glimmer of hope about having some more moments like this one today...for photography therapy.
A funny thought just occurred to me...as much as I love the feel of shallow dof, this is how my vision looked while trying on a pair of progressive-lensed eyeglasses. (I should be wearing bifocals...according to my last few eye exams) I would think I would enjoy viewing the magical world like this all the time, but not through glasses-only through the camera!
Here are some other examples of extraordinary homemade pinhole cameras :
My Flickr photo buddy, art y fotos, makes beautiful pinhole cameras from bamboo cases. Here is one of his videos, demonstrating the use of the camera with instant film.
Here is a video I made, as a DIY tutorial of making a pumpkin pinhole camera. It includes the camera construction, picture-taking, darkroom developing, and results. It's a bit detailed, but an entertaining video:
Here is an amazing pinhole project: the world's largest pinhole camera and picture were made in 2006, using an airplane hangar as the pinhole camera! It was originally called The Great Picture project. Here is a news video highlighting it's gallery showing:
Here is another amazing large scale camera obscura- Abelardo Morell makes pinhole cameras out of darkened rooms, by covering up the windows, except for a circle of light for the pinhole. While inside the room, you see a magical view of the world outside, backwards and upside down!
And, venturing into the highly unusual, you can view Justin Quinnell's mouth pinhole camera here.
You can also make a pinhole camera from a film or digital camera, as long as you can remove the lens:
Here is my digital SLR, with a pinhole plate taped to the from of the camera body, replacing a lens. It's a great way to see instant results, and play with, and learn about, exposure settings to get an image. There are manufactured pinhole plates you can buy from custom photography shops or online, or you can make one yourself.
Pinhole video? Yes, you can!!! Here is a video I made with my SLR camera, with the pinhole plate. It gives the world a surreal, starburst and soft focus look:
Next time: extreme time-lapse pinhole photography, documenting the sun trails across the sky for months or years: solargraphy!
Now we continue in this Obscur(a) pinhole photography series- making a homemade camera from household items! (and also pictures, thanks to some old-fashioned darkroom supplies)
Below is a step-by-step tutorial/record/blog post of my first pinhole camera construction back in 2008. We made that camera from an oatmeal box, following the very excellent tutorial by Stewart Woodruff. If you would like to make your own pinhole camera, I highly recommend this very detailed, user-friendly, step-by-step tutorial, which covers camera construction to taking pictures to developing them at home.
Without further ado, here is my 2008 blog post of our first pinhole camera construction, picture-taking, developing in the bathroom-darkroom, and results!
Presenting........
Our new camera!!!!!!! No, really! It's a new summer project- we are making a pinhole camera to take real photographs, with the assemblage of an oatmeal box, and several other inexpensive items. Pinhole Camera Blog!A pinhole camera uses the most basic ideas of photography to produce an image on a film medium. No lens is needed, just a pin hole of light entering a dark box, projecting the image onto photographic paper. (film can be used, too) The photo paper is then developed in a darkroom with basic black and white photo chemicals, making a paper "negative" of the image. This paper negative can then be placed on top of a blank sheet of photo paper, (and with exposure to light), to make contact prints of the image- you can make as many prints from your original paper negative as you like.
The actual picture-taking takes seconds- so it's back to the old days in terms of the subject needing to remain still (for an average of 20 seconds or so) to get as clear of an image as possible. There are many basic photography principles we can learn here- aperture size, length of exposure depending on the lighting conditions, focal length needed for a focused image, composition, developing film, making prints, etc. So I hope our whole family enjoys this project, and I hope you will stop in to see how we are progressing!
The very complete, family-friendly instructions we are following are at this website here-
authored by Stewart Lewis Woodruff. Thank you, Stewart!
So here's to taking photos with an oatmeal box, making oatmeal cookies to go along with it, for 100% whole grain, all natural, great fun and learning!!!
I will just keep adding our progress to the end of this post, so please scroll down for the latest activity.....
Day 1- June 8, 2008 First, we emptied the box, placing our future oatmeal cookies in a ziploc for now. Then we measured a place to put the hole where the pinhole will eventually be......
You can either cut out a little square at the measured location, or drill a hole with a dremel tool or drill. We used the drill- making a small pilot hole first, then using a larger drill bit to finish the job.
Then I removed the loose paper around the edges of the hole with scissors, and wiped out the oatmeal and cardboard dust with a moist paper towel.
Next, we traced the lid with a pencil onto contact paper, cut out the circles, and lined the outside and inside of the lid with the contact paper circles. Then we put a bead of white glue around the seam between the bottom of the box and the cylinder. These measures are taken to prevent and light leaks into the camera body. (the inside of the box).
When the glue was dry, it was time to paint.......
A little flat black spray paint on the lid, bottom of the box, and inside of the box.....
And here we are as of June 8, 2008......
Tomorrow...hopefully we'll make the actual pin hole in a sheet of aluminum (the side of a soda can), and then mount that inside the camera body, lined up with the shutter hole we made today. First I need to find a #16 beading needle to make the hole- wish me luck!
Day 2-June 9, 2008
Today we made the aperture/"lens"......
The "lens" is really just the pinhole. The pinhole produces it's sharpest images when it is a clean, crisp, round hole. So the hole is made in aluminum, rather than just punching the hole in the side of the box. Our a pinhole plate was provided by a Kern's Nectar can (peach flavor) - Son is cutting off the ends of the can here with scissors. (don't use your best, sharpest pair- it won't stay sharp) Then eventually, we get a nice sheet of metal.......and cut it into a 2X3-inch rectangle, with rounded corners.
The pinhole drill......we ended up finding a teeny #12 needle to make the pinhole. Since it is so very very very thin, the needle needs a handle, or it will be too hard to ...uh well, handle, and will most likely break. The needle was mounted to it's clothespin handle with a dab of epoxy.
Son very carefully makes the pinhole. The needles is eased very gently into the metal, and both sides are sanded with fine sandpaper. (we used 250 grain)
Here's our peachy little pinhole........
At last, the pinhole plate is glued into place with epoxy, with black electrical tape surrounding the edges to seal out any unwanted light leaks.
Look at the teeny tiny size of that lens/aperture!!!! I bet it gets f2000! The depth of field will be fantastic, I hope! It does not seem possible that the tiny stream of light this camera produces will fill a sheet of photo paper with a large image!!! We shall soon see......
Coming up next time.....making the shutter!
Signing off for June 9, 2008........ Day 3- June 12, 2008
Last time, we made the pinhole, and installed it in the camera body. Now we move to the final part of making the camera:
The shutter.........
Here are all the remaining parts to install. The two strips are the shutter guides, and the rectangle with the cardboard handle is the shutter itself. The black strips are electrical tape to stick the shutter guides on the camera body. The guides were made from a manilla file folder, and the shutter handle from a granola bar box. (also 100% whole grain!)
This is how the shutter mechanism will work. The shutter free floats underneath the shutter guides, and slides back and forth. Now it's time to put it on the camera body.....
First, I put the guides on the body by sticking them on loosely with the electrical tape. Then, I loosened and lift one side of both guides to put the shutter underneath the guides. The tape is restuck, and I adjusted the space between the guides so the shutter would slide easily, but not too easily. After the guides were stuck back in place firmly, I drew a mark on the guides above and below the pinhole, so the shutter handle can be placed directly over the pinhole. This helps in aiming the camera when setting up the shot.
And here is the finished pinhole camera!! Mr. Quaker still looks cheerful, even though he is gagged!!!
I would love to bring this camera along on our family vacation in a few weeks.....do you think I could get it by airport security, without them thinking it's some sort of homemade paraphernalia?
Now we're off to go purchase the photographic paper, and darkroom chemicals....
Next time....taking photos!!!!!! Maybe we'll have a few developed that we can scan in and post! Day 4- June 15, 2008 A very exciting day! We got all our supplies together, read up on darkroom procedures, and took and developed some photos!!!
The "film" : Ilford resin coated photographic paper- purchased at the photography supply store. It came in 5X7 size, about $20 for 25 sheets. We got the "pearl" finish (closer to matte than glossy) The photo paper served as a "paper negative" , and the "positive" contact prints (the actual photos).
Taking the photos:
All paper loading, developing, and printing must be done in the dark under a red "safelight" to avoid exposing the paper to white light. (save the white light exposure for the actual picture-taking)
There are red/brown darkroom bulbs you can purchase at photo supply stores, but we just tried Husband's (one of many) red LED flashlights, and it worked out just fine.
Our bathroom has a window, so we covered it up with some black foam board we had handy....
The painter's tape worked fine to hold it up in the window space, but it let light through the cracks- so an andditional layer of black electrical talpe sealed those cracks. We toed in a towel int he door threshold to keep out the light there.
Our bathroom is alaso really small- as you can see, no counter space to work on.....
But luckily, the card table fit into the shower.....
Loading the camera:
Making sure the shiny side faces outward, the photo paper is placed inside the camera body on the opposite wall from the pinhole, so the light travels through the pinhole, and projects the image onto the paper. The the top of the camera is put back on- all of this done in the darkroom under the safelight. Now it's time to take a photo!
Here is the oatmeal box taking a photo of the same Gerber Daisy (thank you for the ID, KellySAHM and Wheaties2bk!!) Notice the bloom is a bit peeked today- it's about done. Anyway, the flip flop on top of the camera helps to steady it, as there was a breeze, and without it, the camera would have blown away. You want the camera to be as still as possible for the sharpest-possible photo. Since the exposure times are long, it's impossible to hand hold the camera for a fairly still image.
We tried the exposure time of 20 seconds as suggested by the website instructions, but found that in today's cloudy conditions, with our specific camera, that it wasn't nearly enough. In fact, when we tried to develop the paper negative, there weas no image at all! (just white paper) So we increased the exposure time to 1 1/2 minutes on average, and that produced an image.
So after taking the photo, it's back to the darkroom again to remove the paper negative from the camera, and develop it......
The first tray on the left is the developer- put the paper in there first. When it seems developed enough, move it to the middle tray, which is just plain water ("stop bath") to stop the developing- so the photo doesn't get too dark. The third tray has the fixer solution in it, which fixes the image to the paper, so it doesn't fade over time. After the fixer, just run clear water over the print to wash away all chemicals, and air dry on some towels (old ones!) All this is done, of course, under the safelight in the dark.
Ok, ok...the photos!!!!!! I am learning to appreciate the science and art of film developing! I need more practice in figuring out proper exposure times in the camera, as well as development times, too...but here is what we did today:
On the left will be the original "paper negatives" - the original images taken with the camera. On the right will be the contact print "positives"- the photo prints that were later made from these negatives (explained in a minute)
The left is the original "negative" developed form the photo taken in the camera, the right, the "positive" print made from the negative. In this shot, I put the camera facing up at the sky at the base of the pine tree in the veggie garden.......
Here'e the Gerber Daisy..(negative on the left, the positive print on the right) this one could have used more exposure time..... Notice how they are mirror images of each other, in addition to being of opposite color?
And here is my pinhole self-portrait! This camera has an incredibly wide angle- probably due to the curvature of the oatmeal box bending the photo paper. The exposure for all of these were about a minute and a half, with the wind, as well as just being human, causing movement and blurriness. The shape of the pinhole can affect the sharpness of the photos, too.
The photos filled up the entire 5X7 sheets of photo paper beautifully! They may not be as clear as photos taken with a manufactured camera and lens, and they may be in black and white......but these photos were made with an oatmeal box, pinhole made with a needle, and no lens!!!!! I think that is very, very cool!!!!!!!!! Homemade oatmeal box photos!!!! I'm tickled!!!!!
How to make the "positive" photos from the original negatives:
It's called "contact printing". The procedure involves putting 2 pieces of photo paper together: (in the darkroom under the safelight) The glossy side of a blank piece of photo paper, and the developed side of a paper negative. The paper negative goes on top. These stacked papers are put on a hard surface, with a plate of glass on top of them, to maintain contact. (I used the glass from a regular store-bought 8X10 picture frame) Then, hold a 15-watt white bulb on a cord (with a clicker switch) 3 feet above the stacked papers under glass, and turn the light on for a few seconds. (under 5) The dark areas of the negative keep the light from passing through to the blank photo paper, while the light areas expose the blank photo paper, all together, making a positive image. After turning off the light (and again in dark conditions) develop this new print in the same chemicals as before. This time though, you have a "positive" print of the original image taken by the camera! You can make as many prints from the original "paper negative" as you wish!
Daughter really loved the darkroom process. She made lots of contact prints with me tonight. We need to get more photo paper!
Ending reflections:
Although the camera is made with pennies from household items, the photo paper and darkroom chemicals are more expensive- about $20 for a pack of 5X7 photo paper (25 sheets- it goes fast!) and about $15-20 of developing chemicals- that will last you a long time, though.
For our purposes, it does not seem necessary to use a special darkroom safelight. Many people seem to have come up with creative and inexpensive ways to create a red safelight, blocking out most unwanted white light. The red LED flashlight worked for us, and others have wrapped white lights inside fixtures in red cellophane. (be careful of melting!) I read that the red tinted party bulbs can leak tungsten light at the base, and some folks don't recommend them. The worst scenario I've read for this is fuzziness in photos- what fuzziness you tolerate may vary.
About half of the photos we took today came out- we need to get a better feel for lighting conditions and correct exposure times. That will come with practice!
An ending funny anectote:
There was one photo I wished to have come out- the front of the restaurant we ate at tonight. They have a nice neon sign, and parking lot lighting that illuminates the building really well. The photo was taken at sunset, and we put the hatchback door up, and placed the camera on top of that for the shot. Son and I estimated a 3- minute exposure time with the low lighting conditions, but we really needed much more than that (we ended up with white paper hardly exposed) There Son and I were, standing at the back of our vehicle, the back door up, and an oatmeal box perched upon it way up high, all while counting out loud for 3 minutes. Crazy, crazy people...we're out there!!!!
Thus ends the Pinhole Photography Blog!!!! I'll post more photos in future blogs as we practice......
Back to 2012
Did you know??? Worldwide Pinhole Photography Day is coming soon! Every year on the last Sunday in April, folks all over the world make pictures with their pinhole cameras, and upload them into a gallery for all to view and appreciate. It's a day to slow down our hyper-click photography habits and appreciate the very basics of photography- the Zen Of Making Images, if you will. For weeks before, workshop groups get together to learn how to instruct their cameras and take pictures, in preparation for Pinhole Day.
In 2012, Worldwide Pinhole Day is taking place n April 29th. Please check out the website, and galleries of past years to see some very interesting photographs.
pinhole image of the kids enjoying Dairy Queen dilly bars at The Thing in Arizona, several summers ago
.
How I love that old time photography! (-:
As you may have seen occasionally in this blog, I have spent some time photographing with pinhole cameras these past few years. Recently, Theresa of Rebel Homeschool was kind enough to inquire about what I know about pinhole, and about making cameras and images. It was a timely inquiry, as Worldwide Pinhole Day is just around the corner (April 29th), which is the perfect time to do some pinholing!
Inspired by Theresa, I am writing a little pinhole series here from the Cavemomma cave.
As the name suggests, a "pinhole" camera (or "camera obscura", as originally coined) is a very simple device consisting of a light-tight box, and a very small hole to let the light (and image) in. The is no lens to focus the image inside the camera, rather the "pin" hole is so tiny, that the light comes through the hole in an organized manner, and converges inside the box to form an image.
In the illustration above, you see the the light, reflecting a party hat outside the camera, travel through the pinhole, converging inside to form the image on the back wall of the camera. If you want to make a picture of this image, a recording medium must be placed there and be exposed correctly. Common recording mediums include film, photographic paper, or a CCD sensor of a digital camera.
In all cameras, (including our own eyes) the image rendered inside is backwards and upside down compared to it's orientation outside the box. Why is that? It's because the light from the image is entering the camera more or less in a straight line, and converges into the image along that straight line inside the camera. (look at the illustration above to get a better idea)
It is not known how long humans have noticed this pinhole image-making phenomena, but one can bet it has been noticed for a very, very long time. Sunlight cast through holes in leaves, for example, will make images on the ground. Small holes in tent walls will project images from the outside onto the opposite wall inside.
Some documentation exists of desert peoples long ago using pinhole to see the goings on outside their tents during the day, as in this example above. (-:
The first-ever recorded "permanent" photograph is credited to Joseph Nicéphore Niépce, who made the image with a pinhole camera in 1825 or 1826. Below is his first-ever photograph:
1825 or 1826: View from the Window at Le Gras, Joseph Nicéphore Niépce made with a camera obscura. source:Wikimedia Commons
Much has changed since those days- with lenses being affixed to cameras, and improved optics and technology up to this day. But there are small movements everywhere to go back and experience the processes of our photographic roots. and use it's most basic form to make very interesting photographs. Below is a slideshow of modern-day pinhole photography, using homemade and manufactured cameras, film, paper, or digital camera sensors as means of recording the images.
Here is an excellent introduction to pinhole photography by Nancy Breslin:






 It does not seem possible that the tiny stream of light this camera produces will fill a sheet of photo paper with a large image!!! We shall soon see......


 causing movement and blurriness. The shape of the pinhole can affect the sharpness of the photos, too.


